Installation Guide
Updating from v2.x.y
- You can use
git fetch --all --tags; git checkout tags/v2.7.3-rc1 - Please make sure to run
python -m pip install (--user) -r setting/requirements-pip.txtto include updating of dependency python libraries - For
itkdb, we now useitkdb[eos]>=0.6.14which requirespycurlinstallation. Unfortunately for some operation systems installation ofpycurlis not straightforward : see FAQ ofitkdbdocumentation for details. - The service running
app.pyneeds to be restarted after deployment of these packages. Version checks are made foritkdb.module-qc-database-toolsas well asmodule-qc-analysis-toolsand when the environment uses old versions the service won't run.
Info
If you have been using the LocalDB for RD53A modules previously, and you wish to use the same mongoDB server, it could be cleaner to first reserve old databases for RD53A, and then create fresh databases for ITkPix v1.1 and v2 modules.
Moving old databases
# mongodump --archive="mongodump-localdb" --db=localdb
# mongodump --archive="mongodump-localdbtools" --db=localdbtools
# mongorestore --archive="mongodump-localdb" --nsFrom='localdb.*' --nsTo='localdb-rd53a.*'
# mongorestore --archive="mongodump-localdbtools" --nsFrom='localdbtools.*' --nsTo='localdbtools-rd53a.*
Also, Giordon Stark has created a workaround to also run v1.6.x LocalDB for archiving purpose, riding on the above moved databases.
Docker installation
The following examples are using v2.7.3-rc1 of the localdb viewer.
In this example, we'll spin up the mongodb as a separate docker image, but it could additionally be installed directly on the host machine.
The first thing we need to do is set up a bridge network for containers to talk to each other. Easy enough with:
docker network create web
Note
Make sure the local volume exists to persist the mongoDB via mkdir -p ./data/mongodb.
Then we can create the mongodb container and put it on this network:
docker run -d --rm -p 27017:27017 \
           -v $(PWD)/data/mongodb:/data/db \
           --name mongodb --net web \
           mongo:latest
This will run the mongodb in the background as a daemon accessible under localhost:27017 and identifiable by the name mongodb (try running docker ps to see it) and this alias can be used like a DNS on the bridge network we created.
Then we just need to run localdb similarly and give it the right configuration for connecting to mongodb (please change v2.7.3-rc1 to the tag you want):
docker run -d --rm -p 8080:5000 \
           --name localdb --net web \
           gitlab-registry.cern.ch/yarr/localdb-tools/viewer:v2.7.3-rc1 \
            --host=mongodb \
            --port=27017 \
            --db=localdb \
            --username=${LOCALDB_USERNAME} \
            --password=${LOCALDB_PASSWORD} \
            --userdb=localdbtools \
            --fhost=0.0.0.0 \
            --fport=5000
Here, we're mapping port 8080 on the host to 5000 inside the image (for which localdb is configured to listen to). It is also configured to look for mongodb (by it's DNS name) within the bridge network we assigned it to.
The localdb viewer is accessible at http://localhost:8080/localdb.
You can either create the admin login by running:
docker exec -it localdb python create_admin.py <admin_username> <admin_password> --address mongodb
or, alternatively, you can migrate your old database by using mongodump --archive > mongodb.dump (or use docker exec mongodb sh -c 'mongodump --archive' > mongodb.dump if the database is in a Docker container), which should dump the contents of your old database into a file called mongodb.dump. You can restore the archived database into the running MongoDB Docker container using
docker exec -i mongodb sh -c 'mongorestore --archive' < mongodb.dump
which loads the data saved in mongodb.dump into the database.
Cleaning up
You can stop the containers by running:
docker stop localdb
docker stop mongodb
docker network rm web
docker images to list them) by docker image rm <image ID or name>
Upgrading LocalDB
You can upgrade LocalDB by simply stopping the current container (docker stop localdb) and launching another one with a newer tag (as shown above). You may also want to delete the old image as shown in the previous section.
Logs
You can access logs via
docker logs localdb
Note
Make sure the local volume exists to persist the mongoDB via mkdir -p ./data/mongodb.
version: "3.8"

services:
  mongodb:
    restart: unless-stopped
    image: mongo:latest
    container_name: "mongodb"
    volumes:
      - mongodb-storage:/data/db

  localdb:
      restart: unless-stopped
      image: gitlab-registry.cern.ch/yarr/localdb-tools/viewer:v2.7.3-rc1
      container_name: "localdb"
      depends_on:
        - mongodb
      ports:
        - "8080:5000"
      command:
        - "--host=mongodb"
        - "--port=27017"
        - "--db=localdb"
        - "--username=${LOCALDB_USERNAME}"
        - "--password=${LOCALDB_PASSWORD}"
        - "--userdb=localdbtools"
        - "--fhost=0.0.0.0"
        - "--fport=5000"

volumes:
  mongodb-storage:
    driver: local
    driver_opts:
      type: none
      o: bind
      device: ./data/mongodb
Once this file exists, you can run it via docker compose:
docker compose up -d
The localdb viewer is accessible at http://localhost:8080/localdb. We can clean up everything when we're done:
docker compose down
We demonstrate the use of a reverse-proxy to set this up. There are plenty of benefits to using a reverse proxy such as load balancing, setting up TLS (SSL certificates), and provides metrics for diagnostics and monitoring of your web traffic. In this example, traefik is used for the reverse-proxy.
Note
Make sure the local volume exists to persist the mongoDB via mkdir -p ./data/mongodb. You'll additionally need to create the external network for handling incoming requests via docker network create web.
version: "3.8"

services:
  traefik:
    restart: always
    image: "traefik:v2.6"
    container_name: "traefik"
    command:
      #- "--log.level=DEBUG"
      - "--api.insecure=true"
      - "--providers.docker=true"
      - "--providers.docker.exposedbydefault=false"
      # enable ports to listen on
      - "--entrypoints.web.address=:80"
      - "--entrypoints.mongodb.address=:27017"
    ports:
      - "80:80" # http
      - "27017:27017" # mongo
    volumes:
      - "/var/run/docker.sock:/var/run/docker.sock:ro"
    networks:
      - web
      - internal
    labels:
      - "traefik.enable=true"
    logging:
      driver: "json-file"
      options:
        max-file: "5"
        max-size: "50m"

  mongodb:
    restart: unless-stopped
    image: mongo:latest
    container_name: "mongodb"
    volumes:
      - mongodb-storage:/data/db
    labels:
      - "traefik.enable=true"
      - "traefik.tcp.routers.mongodb.rule=(HostSNI(`localhost`))"
      - "traefik.tcp.routers.mongodb.entrypoints=mongodb"
      - "traefik.tcp.services.mongodb.loadbalancer.server.port=27017"
    networks:
      - internal

  localdb:
      restart: unless-stopped
      image: gitlab-registry.cern.ch/yarr/localdb-tools/viewer:v2.7.3-rc1
      container_name: "localdb"
      depends_on:
        - mongodb
      command:
        - "--host=mongodb"
        - "--port=27017"
        - "--db=localdb"
        - "--username=${LOCALDB_USERNAME}"
        - "--password=${LOCALDB_PASSWORD}"
        - "--userdb=localdbtools"
        - "--fhost=0.0.0.0"
        - "--fport=5000"
      labels:
        - "traefik.enable=true"
        - "traefik.http.routers.localdb.rule=(Host(`localhost`) && PathPrefix(`/localdb`))"
        - "traefik.http.routers.localdb.entrypoints=web"
        - "traefik.http.services.localdb.loadbalancer.server.port=5000"
      networks:
        - internal

volumes:
  mongodb-storage:
    driver: local
    driver_opts:
      type: none
      o: bind
      device: ./data/mongodb

networks:
  web:
    external: true
  internal:
    external: false
Once this file exists, you can run it via docker compose:
docker compose up -d
The localdb viewer is accessible at http://localhost/localdb.
We can clean up everything when we're done:
docker compose down
At this point, you can set up the database based on your preferred mode of setting things up. In the above cases with docker, we always set up localdb and mongodb containers (by name) and so we can do the following to run any scripts like create_admin.sh which needs the mongo command-line interface:
docker exec -it mongodb bash
Standalone installation
This installation guide supports CentOS7, CentOS Stream 8 and Alma 9 Linux OS.
MongoDB compatibility
MongoDB version < 8 is required as localDB uses pymongo version 4.8.0. For more info on the compatibilities see https://www.mongodb.com/docs/languages/python/pymongo-driver/v4.8/reference/compatibility/
For CentOS7, we assume "Development and Creative Workstation" Base Environment, with the following Add-Ons checkboxes selected:
- Additional Development
- Development Tools
- Emacs
- File and Storage Server
- Python
- Security Tools
- System Administration Tools
For CentOS Stream 8, we assume "Workstation" Base Environment, with the following Add-Ons checkboxes selected:
- GNOME Applications
- Development Tools
- Graphical Administration Tools
- Network Servers
- Scientific Support
- Security Tools
- System Tools
Preparations
Here we assume all commands are executed by a user who can do sudo.
Install python
The python version distributed by yum/dnf by default is 3.6.8 for both CentOS7 and CentOS Stream 8. However, these native python versions are not supported anymore. For supported python versions please check https://devguide.python.org/versions
Currently, the supported python versions are 3.9 through 3.13.
If you use a virtual python environment, we recommend something that can install a python version that's independent from your OS's native python version like the following:
If you have to update your OS's native python version, please follow instructions here:
- for Alma9: https://cloudspinx.com/how-to-install-python-3-13-on-rocky-linux-almalinux/
- for CentOS7: https://gist.github.com/gavxin/a21128ba0fba006db285c962da941898
CMake3
CMake3 is required to be installed before the following installation.
sudo yum install -y epel-release
sudo yum install -y cmake3
Check
Check cmake3 --version returns cmake3 version 3.17.5
For CentOS 7 only
Install more modern git
The default git version installed on CentOS7 is 1.8, which is a bit old-ish. Let's update the git package first for more comfortable usage. This step is not absolutely required. For CentOS Stream 8 the default deployed git is modern and this step is not needed.
sudo yum -y remove git
sudo yum -y install https://repo.ius.io/ius-release-el7.rpm https://dl.fedoraproject.org/pub/epel/epel-release-latest-7.noarch.rpm
sudo yum install libsecret pcre2
sudo yum -y install git --enablerepo=ius --disablerepo=base,epel,extras,updates
Check
Check git --version returns git version 2.36.1
g++ devtoolset
The analysis-tools package run on the background of the LocalDB viewer requires a modern g++ compiler with -std=c++17. Therefore, devtoolset-7, devtoolset-8 or devtoolset-9 needs to be installed.
Info
YARR requires a more modern g++ 9. If you are installing LocalDB on the same machine as YARR, just replace in the following comments the 7 with a 9. Do the same in the setting/requirements-yum.txt.
sudo yum install -y centos-release-scl
sudo yum install -y devtoolset-7
source /opt/rh/devtoolset-7/enable
source /opt/rh/devtoolset-7/enable >> ~/.bashrc
Check
Check g++ --version returns
g++ (GCC) 7.3.1 20180303 (Red Hat 7.3.1-5)
Copyright (C) 2017 Free Software Foundation, Inc.
This is free software; see the source for copying conditions.  There is NO
warranty; not even for MERCHANTABILITY or FITNESS FOR A PARTICULAR PURPOSE.
Localdb-tools setup
Once the above basic environment setup is done, we can start installation of the LocalDB package. This includes installation of various yum/dnf packages, including:
- root
- influxdb
- grafana
, as well as various python modules via pip e.g.:
- Flask
- influxdb
- itkdb
- matplotlib
- numpy
- pymongo
- plotly
- scipy
Then the script configures services like mongod influxd.
After these infrastructures are setup, then there are a couple of scripts to make initial configuration of LocalDB specific things.
Initial setup
git clone https://gitlab.cern.ch/YARR/localdb-tools.git
cd localdb-tools/setting
./db_server_install.sh
The last shell script is a long process. There are several queries asking your confirmation, all should be answered y for new installation.
[2022-07-12 14:21:04]  [LDB] Looking for missing packages for Local DB and Tools ...
[2022-07-12 14:21:04]  [LDB]     Checking Python version ...
[2022-07-12 14:21:04]  [LDB]     Checking yum packages ...
[2022-07-12 14:21:14]  [LDB] Done.
[2022-07-12 14:21:14]  [LDB]     Checking Python packages ...
[2022-07-12 14:21:20]  ------------------------------------
[2022-07-12 14:21:20]            Missing packages
[2022-07-12 14:21:20]  ------------------------------------
[2022-07-12 14:21:20]   yum    : root.x86_64
...
[2022-07-12 14:21:20]   yum    : grafana.x86_64
[2022-07-12 14:21:20]   python : arguments
[2022-07-12 14:21:20]   python : coloredlogs
[2022-07-12 14:21:20]   python : Flask
...
[2022-07-12 14:21:20]   python : scipy
[2022-07-12 14:21:20]  ------------------------------------
[2022-07-12 14:21:20]
[2022-07-12 14:21:20]  [LDB] Install all these packages? [y/n]
y
[2022-07-12 14:21:47]
[2022-07-12 14:21:47]  [LDB] Following steps will be done ...
[2022-07-12 14:21:47]  [LDB] - Install required packages by yum & pip.
[2022-07-12 14:21:47]  [LDB]
[2022-07-12 14:21:47]  [LDB] You need to be root to perform this command.
[2022-07-12 14:21:47]  [LDB] OK!
[2022-07-12 14:21:47]  [LDB] Start.
...
[2022-07-12 14:26:58]  [LDB] Done.
[2022-07-12 14:26:58]  [LDB]
[2022-07-12 14:26:58]  [LDB] Finished installation!!
[2022-07-12 14:26:58]  [LDB] Install log can be found in: /home/itkqc/localdb-tools/setting/instlog/20220712_142104
[2022-07-12 14:26:58]  [LDB]
[2022-07-12 14:26:58]  [LDB] Setting up mongod...
[2022-07-12 14:26:58]  [LDB] Starting mongod on your local machine.
[2022-07-12 14:27:05]  [LDB] mongod is already enabled. Nothing to do.
[2022-07-12 14:27:05]  [LDB]
[2022-07-12 14:27:05]  [LDB] Set Local DB Server:
[2022-07-12 14:27:05]  [LDB]     IP address: 127.0.0.1
[2022-07-12 14:27:05]  [LDB]     port      : 27017
[2022-07-12 14:27:05]  [LDB] Done.
[2022-07-12 14:27:05]  [LDB] Setting up influxd...
[2022-07-12 14:27:05]  [LDB] Starting influxdb on your local machine.
[2022-07-12 14:27:06]  [LDB] influxdb is already enabled. Nothing to do.
[2022-07-12 14:27:06]  [LDB]
[2022-07-12 14:27:06]  [LDB] Set influxDB Server:
[2022-07-12 14:27:06]  [LDB]     IP address: 127.0.0.1
[2022-07-12 14:27:06]  [LDB]     port      : 8086
[2022-07-12 14:27:06]  [LDB] Done.
[2022-07-12 14:27:06]  [LDB] Setting up grafana-server...
[2022-07-12 14:27:06]  [LDB] Starting grafana-server on your local machine.
[2022-07-12 14:27:57]  [LDB] Enabling grafana-server on your local machine.
[2022-07-12 14:27:58]  Created symlink from /etc/systemd/system/multi-user.target.wants/grafana-server.service to /usr/lib/systemd/system/grafana-server.service.
[2022-07-12 14:27:58]  [LDB]
[2022-07-12 14:27:58]  [LDB] Set Grafana Server:
[2022-07-12 14:27:58]  [LDB]     IP address: 127.0.0.1
[2022-07-12 14:27:58]  [LDB]     port      : 3000
[2022-07-12 14:27:58]  [LDB] Done.
[2022-07-12 14:27:58]  [LDB]
[2022-07-12 14:27:58]  [LDB] Finished!!
[2022-07-12 14:27:58]  [LDB]
[2022-07-12 14:27:58]  [LDB] Final confirming ...
[2022-07-12 14:28:20]  ------------------------------------
[2022-07-12 14:28:20]  [LDB] LocalDB admin configuration is not present in the default path (/home/itkqc/localdb-tools/viewer/admin_conf.yml).
[2022-07-12 14:28:20]  [LDB] Please configure admin_conf.yml manually by running create_admin.sh
[2022-07-12 14:28:20]
[2022-07-12 14:28:20]  [LDB] Success!!
[2022-07-12 14:28:20]
[2022-07-12 14:28:20]  ----------------------------------------
[2022-07-12 14:28:20]  # Quick tutorial
[2022-07-12 14:28:20]
[2022-07-12 14:28:20]  ## 1. Create admin config
[2022-07-12 14:28:20]  $ cd /home/itkqc/localdb-tools/setting
[2022-07-12 14:28:20]  $ ./create_admin.sh
[2022-07-12 14:28:20]
[2022-07-12 14:28:20]  ## 2. Setup Viewer Application
[2022-07-12 14:28:20]  $ cd /home/itkqc/localdb-tools/viewer
[2022-07-12 14:28:20]  $ ./setup_viewer.sh
[2022-07-12 14:28:20]  $ python app.py --config admin_conf.yml
[2022-07-12 14:28:20]
[2022-07-12 14:28:20]  ## 3. Access Viewer Application
[2022-07-12 14:28:20]  - From the DB machine: http://localhost:5000/localdb/
[2022-07-12 14:28:20]
[2022-07-12 14:28:20]  ## 4.Check more detail
[2022-07-12 14:28:20]  - https://localdb-docs.readthedocs.io/en/master/
[2022-07-12 14:28:20]  ----------------------------------------
[2022-07-12 14:28:20]  Enjoy!!
Once the last messages from # Quick tutorial is shown, the installation should be successfully completed.
Note
For other Linux distributions than CentOS7, it could be the case that some yum packages are not possible to install. This may include centos-release-scl.noarch, devtoolset-7.x86_64 or cmake3.x86_64 for instance. If you observe them, please comment-out those packages by putting # at the first character of the line or completely delete these lines from setting/requirements-yum.txt and rerun setting/db_server_install.sh.
Create admin account on MongoDB
LocalDB has a sign-in system in the browser. An admin account is needed for the LocalDB. The admin has a special role in operation of QC processes, especially actions involving data handling with the ITk production DB, like stage sign-off. In the viewer, there are a number of action buttons which only appears after signing-in as an admin.
./create_admin.sh
Authentication succeeded!
Local DB Server IP address: 127.0.0.1
Local DB Server port: 27017
Are you sure that's correct? [y/n]

> y
Here we use admin as an admin account name:
Register localDB admin's username: admin
Register localDB admin's password:
Successfully added user:
    user: itkqc
    roles: [ 'localdb': 'userAdmin', 'localdbtools': 'userAdmin', 'localdb': 'readWrite', 'localdbtools': 'readWrite' ]

Finished the setting of localdb with certification!!

For checking the setting of Local DB: /etc/mongod.conf
With this process, the admin account is created in the MongoDB service.
Setup viewer
Finally we can setup the configuration for the viewer. The viewer is an HTTP service developed within the Flask webapp framework. In principle, the host of the viewer application (app.py) can be independent from the MongoDB server. However, in this documentation we simply assume that the same PC host is used as the webapp server as well.
cd localdb-tools/viewer
./setup_viewer.sh
[LDB] Welcome to Local Database Tools!
[LDB] Check python modules...
[LDB] Requirements already satisfied
[LDB]
Local DB Server IP address: 127.0.0.1
Local DB Server port: 27017
The script identifies the localhost:27017 mongod service. Answer yes.
[LDB] Are you sure that's correct? [y/n]
> y
Next the script asks to use the admin features. Answer yes.
[LDB] Do you use admin functions for LocalDB viewer? [y/n]
> y
Then type the admin account name and password just created in the previous section:
Input localDB admin's username: admin
Input localDB admin's password:

[LDB] Authentication succeeded!
The rest should be automatic.
[LDB] Setting the configuration file: /home/itkqc/localdb-tools/viewer/admin_conf.yml
[LDB]
[LDB] Check plotting tool and analysis tool...
Submodule 'viewer/analysis-tool' (https://gitlab.cern.ch/YARR/utilities/localdb-qcanalysis-tools.git) registered for path 'analysis-tool'
Submodule 'viewer/itkpd-interface/localdb-interface' (https://gitlab.cern.ch/YARR/utilities/localdb-interface.git) registered for path 'itkpd-interface/localdb-interface'
Submodule 'viewer/plotting-tool' (https://gitlab.cern.ch/YARR/utilities/plotting-tools.git) registered for path 'plotting-tool'
Cloning into '/home/itkqc/localdb-tools/viewer/analysis-tool'...
Cloning into '/home/itkqc/localdb-tools/viewer/itkpd-interface/localdb-interface'...
Cloning into '/home/itkqc/localdb-tools/viewer/plotting-tool'...
Submodule path 'analysis-tool': checked out '138ca62e7ac8a7d66ecc8af4019af340d47e13dc'
Submodule path 'itkpd-interface/localdb-interface': checked out '0e2bf7e89cf07cad7fa560a6e0a4a107331357fd'
Submodule path 'plotting-tool': checked out 'deb5f1e4ebbc72c176fe749521fe5c2549554401'
[LDB]
[LDB] Finished setting up of Viewer Application!!
[LDB]
[LDB] Start Viewer Webapp locally by ...
[LDB]   python /home/itkqc/localdb-tools/viewer/app.py --config /home/itkqc/localdb-tools/viewer/admin_conf.yml
[LDB]
[LDB] Start Viewer Webapp as a service:
[LDB]   sudo systemctl enable localdb.viewer
[LDB]   sudo systemctl start localdb.viewer
[LDB]
[LDB] For exposing the port 5000 outside the firewall:
[LDB]   firewall-cmd --port=5000/tcp --zone=public --permanent
[LDB]   firewall-cmd --reload
[LDB]
[LDB] Access the Local DB page on web browser ...
[LDB]   http://localhost:5000/localdb/
[LDB]
[LDB] More information: https://localdb-docs.readthedocs.io/en/master/
And with this state the viewer webapp can be launched.
Running the viewer webapp
The webapp is app.py which needs a launching config file as an input. After executing setup_viewer.sh, there should be a new file admin_conf.yml created under localdb-tools/viewer. We use this config file to launch the webapp. Let's run it:
cd localdb-tools/viewer
python app.py --config admin_conf.yml
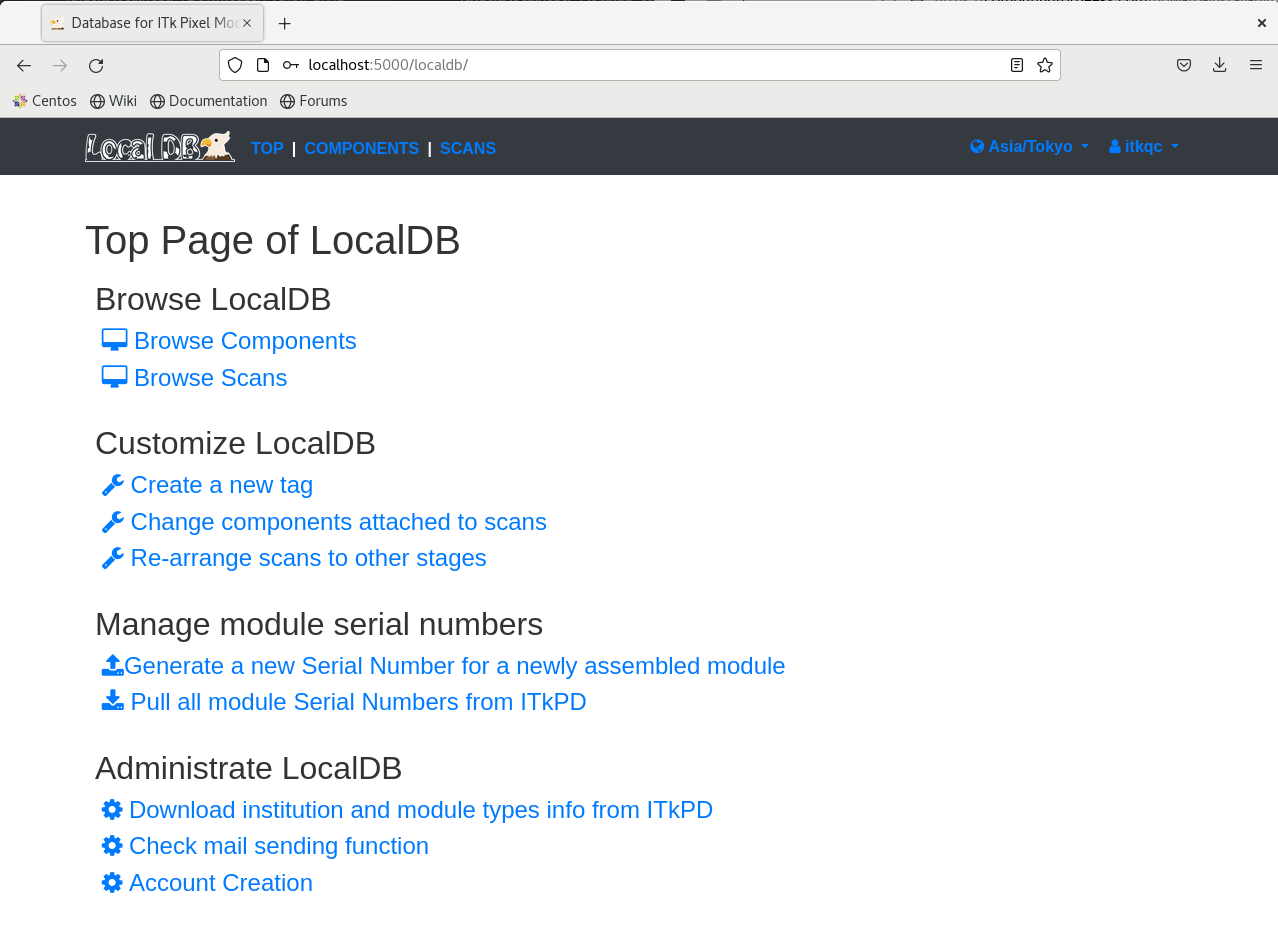
At this point, the app is simply executed as a user's process, and the app can be simply killed by Ctrl-c. After 10-20 seconds of waiting, you can open the webpage via your browser accessing the following URL:
http://localhost:5000/localdb/
If you can see the following top page, the webapp runs successfully.

Now, let's try to sign-in as an admin. Clicking the "Sign in" button shows you a box with username and password fields:
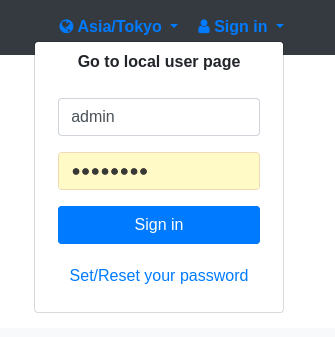
After pressing "Sign in" blue box, you sign in the webapp system.
Opening the firewall port
The default LocalDB webapp port, 5000 is presumably blocked by firewall by default. In order to open this port to other hosts in the site, you can do:
firewall-cmd --add-port=5000/tcp --zone=public --permanent
firewall-cmd --reload
Running the viewer webapp as a service
The above setup_viewer.sh script also deploys /etc/systemd/system/localdb.viewer.service in order to run the webapp as a system service. You can enable the service to permanently run as a service by the following commands.
sudo systemctl enable localdb.viewer
sudo systemctl start localdb.viewer
If a different python environment is preferred, this can be modified in /etc/systemd/system/localdb.viewer.service by changing the Environment variable, e.g.
[Service]
User=<USER>
WorkingDirectory=<WORKDIR>
Environment="PATH=/home/itk/.local/bin/"
ExecStart=<EXECSTART>
Restart=always
For more information see https://serverfault.com/questions/413397/how-to-set-environment-variable-in-systemd-service
module-qc-nonelec-gui setup
The module-qc-nonelec-gui, previously known to as QCHelper, is a GUI tool to support uploading non-electrical module QC tests to LocalDB. This system is assumed to be deployed over multiple client host PCs handling devices, e.g.
- a PC controlling a camera system for optical inspection
- a PC controlling test results of metrology
- a PC controlling IV scan interacting with the HV module
Therefore installation to the host of LocalDB and its Viewer webapp is not required. For testing purpose, having an installation to LocalDB host is not harmful.
git clone https://gitlab.cern.ch/atlas-itk/pixel/module/module-qc-nonelec-gui
cd module-qc-nonelec-gui
And run the following installation command
python -m pip install --user -e .
\Obtaining file:///Users/oide/KEKCloud/Work/itk/module-qc-nonelec-gui
  Installing build dependencies ... done
  Checking if build backend supports build_editable ... done
  Getting requirements to build editable ... done
  Preparing editable metadata (pyproject.toml) ... done
Collecting itkdb>=0.4.0
  Using cached itkdb-0.4.0-py3-none-any.whl (52 kB)

...

Building wheels for collected packages: module-qc-nonelec-gui
  Building editable for module-qc-nonelec-gui (pyproject.toml) ... done
  Created wheel for module-qc-nonelec-gui: filename=module_qc_nonelec_gui-0.0.2.dev4-py3-none-any.whl size=6267 sha256=f7b055af779c1804e434540a875eae36bca84ef91ecaa4ca9c135fd4e19f49ec
  Stored in directory: /private/var/folders/wq/cf_nbm4j03g2pnyftn8xq57h0000gn/T/pip-ephem-wheel-cache-j3lvuabs/wheels/28/5a/a0/e825ab28e4a46e2d363382af21af87d64d5ccdee8dabcad673
Successfully built module-qc-nonelec-gui
Installing collected packages: pyasn1, msgpack, lockfile, urllib3, simple-settings, rsa, python-magic, python-dotenv, pyrsistent, pymongo, pylibmagic, opencv-python-headless, idna, ecdsa, click, charset-normalizer, certifi, attrs, typer, requests, python-jose, jsonschema, cachecontrol, itkdb, module-qc-nonelec-gui
Successfully installed attrs-22.2.0 cachecontrol-0.12.11 certifi-2022.12.7 charset-normalizer-3.1.0 click-8.1.3 ecdsa-0.18.0 idna-3.4 itkdb-0.4.0 jsonschema-4.17.3 lockfile-0.12.2 module-qc-nonelec-gui-0.0.2.dev4 msgpack-1.0.5 opencv-python-headless-3.4.18.65 pyasn1-0.4.8 pylibmagic-0.2.2 pymongo-3.13.0 pyrsistent-0.19.3 python-dotenv-1.0.0 python-jose-3.3.0 python-magic-0.4.27 requests-2.28.2 rsa-4.9 simple-settings-1.2.0 typer-0.7.0 urllib3-1.26.15
Note
For macOS, it will be required to install pyqt via Homebrew: brew install pyqt5
Note
You will need to configure the LocalDB host in the configuration file src/module_qc_nonelec_gui/configuration/configuration.json, especially when you run QCHelper on a different host than the LocalDB host.
  "mongoDB": { "address": "127.0.0.1", "port": "27017" },
  "localDB_web": { "address": "127.0.0.1", "port": "5010" },
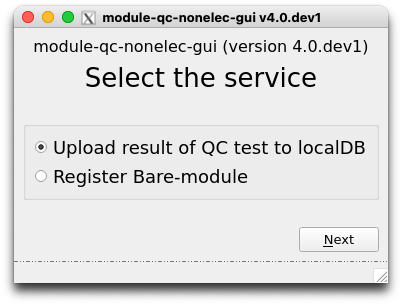
That's it! Now you will be able to launch module-qc-nonelec-gui
module-qc-nonelec-gui &
and a GUI window asking ITk production DB passcodes should pop up.
YARR setup
The interface between YARR and localDB is handled through module-qc-database-tools. You have to download and install the repository in order to access the bash files and use the commandline interface:
git clone https://gitlab.cern.ch/atlas-itk/pixel/module/module-qc-database-tools.git
cd module-qc-database-tools
git checkout <version>
python -m pip install --user -e .
Then set up LocalDB:
cd src/module_qc_database_tools/yarr
./setup_db.sh
[LDB] Set editor command ... (e.g. nano, vim, emacs)
[LDB] > emacs
[LDB]
[LDB] Checking Python Packages ...
[LDB ERROR] There are missing pip modules:
[LDB ERROR] - pandas
[LDB ERROR]
[LDB ERROR] Install them by:
[LDB ERROR] python -m pip install --user -r /home/itkqc/module-qc-database-tools/src/module_qc_database_tools/yarr/setting/requirements-pip.txt
Uh oh, it assumes to have pandas python module to be installed. Let's install it by copy&pasting the suggested command:
python -m pip install --user -r /home/itkqc/module-qc-database-tools/src/module_qc_database_tools/yarr/setting/requirements-pip.txt
Then let's retry setup_db.sh:
./setup_db.sh
[LDB] Set editor command ... (e.g. nano, vim, emacs)
[LDB] > nano
[LDB]
[LDB] Checking Python Packages ...
[LDB]     ... OK!
[LDB]
[LDB] Checking Database Config: /home/itkqc/.yarr/localdb/nuc_database.json ...
[LDB]
[LDB] -----------------------
[LDB] --  Mongo DB Server  --
[LDB] -----------------------
[LDB] IP address       : 127.0.0.1
[LDB] port             : 27017
[LDB] database name    : localdb
[LDB] -----------------------
[LDB]
The script asks if the LocalDB host is correct. Edit it if it is incorrect.
[LDB] Are you sure that is correct? (Move to edit mode when answer 'n') [y/n/exit]
[LDB] > y
[LDB] Created Database Config: /home/itkqc/.yarr/localdb/nuc_database.json.
[LDB]
[LDB] Checking User Config: /home/itkqc/.yarr/localdb/user.json ...
[LDB]
[LDB] -----------------------
[LDB] --  User Information --
[LDB] -----------------------
[LDB] User Name        : itkqc
[LDB] User Institution : nuc
[LDB] -----------------------
[LDB]
The script asks if the YARR scan user name and its institute is correct. Edit it if it is correct.
[LDB] Are you sure that is correct? (Move to edit mode when answer 'n') [y/n/exit]
[LDB] > n
libGL error: No matching fbConfigs or visuals found
libGL error: failed to load driver: swrast
[LDB] Created User Config: /home/itkqc/.yarr/localdb/user.json
[LDB]
[LDB] Checking Site Config: /home/itkqc/.yarr/localdb/nuc_site.json ...
[LDB]
[LDB] -----------------------
[LDB] --  Site Information --
[LDB] -----------------------
[LDB] site name        : nuc
[LDB] -----------------------
[LDB]
The script asks if the site name is correct. Edit it if it is correct.
Attention
Specify the institution code as it is registered in the ITk Production Database
[LDB] Are you sure that is correct? (Move to edit mode when answer 'n') [y/n/exit]
[LDB] > n
[LDB] Created Site Config: /home/itkqc/.yarr/localdb/nuc_site.json.
[LDB]
[LDB] Checking the connection...
[12:00:29:176][  info  ][   Local DB    ]: ------------------------------
[12:00:29:176][  info  ][   Local DB    ]: Function: Initialize upload function and check connection to Local DB
[12:00:29:180][  info  ][   Local DB    ]: -> Setting database config: /home/itkqc/.yarr/localdb/nuc_database.json (default)
[12:00:29:180][  info  ][   Local DB    ]: Checking connection to DB Server: mongodb://127.0.0.1:27017/localdb ...
[12:00:29:185][  info  ][   Local DB    ]: ---> Good connection!
[12:00:31:238][  info  ][   Local DB    ]: ------------------------------
[LDB] Done.
[LDB]
[LDB] To upoad the test data into Local DB after scanConsole:
[LDB]   $ ./bin/scanConsole -c <conn> -r <ctr> -s <scan> -W
[LDB] More detail:
[LDB]   Access 'https://localdb-docs.readthedocs.io/en/master/' (master branch)
[LDB]   Access 'https://localdb-docs.readthedocs.io/en/devel/'  (devel branch)
Now you can check connection to LocalDB by
source login_mongodb.sh
returns
Input mongodb account's username: itkqc
Input mongodb account's password:
[12:00:55:183][  info  ][   Local DB    ]: -----------------------
[12:00:55:184][  info  ][   Local DB    ]: Checking connection to DB Server: mongodb://127.0.0.1:27017/localdb ...
[12:00:55:189][  info  ][   Local DB    ]: ---> Good connection!
[12:00:55:266][  info  ][   Local DB    ]: -> Set user config: /home/itkqc/.yarr/localdb/user.json
[12:00:55:266][  info  ][   Local DB    ]: ~~~ {
[12:00:55:266][  info  ][   Local DB    ]: ~~~   "userName": "itkqc"
[12:00:55:266][  info  ][   Local DB    ]: ~~~   "institution": ""
[12:00:55:266][  info  ][   Local DB    ]: ~~~   "description": "viewer"
[12:00:55:266][  info  ][   Local DB    ]: ~~~   "viewerUser": "itkqc"
[12:00:55:266][  info  ][   Local DB    ]: ~~~ }
[12:00:55:630][  info  ][   Local DB    ]: -> Set site config: /home/itkqc/.yarr/localdb/nuc_site.json
[12:00:55:630][  info  ][   Local DB    ]: ~~~ {
[12:00:55:630][  info  ][   Local DB    ]: ~~~   "institution": "High Energy Accelerator Research Organization (KEK)"
[12:00:55:630][  info  ][   Local DB    ]: ~~~   "code": "KEK"
[12:00:55:630][  info  ][   Local DB    ]: ~~~ }
[12:00:55:630][  info  ][   Local DB    ]: -----------------------

[LDB] Login successful.
[LDB] Username and password are saved.