Module QC Workflow
Version information
This document is compatible with localdb-tools version 2.2.36 or later. The corresponding YARR version is v1.5.2 or later.
For the user-facing module QC * tools please see their dedicated documentations:
- module QC database tools: https://atlas-itk-pixel-mqdbt.docs.cern.ch
- module QC measurement tools: https://atlas-itk-pixel-mqt.docs.cern.ch
- module QC analysis tools: https://atlas-itk-pixel-mqat.docs.cern.ch
One additional package is used by all mq*t above but is not user-facing:
- module QC data tools: https://atlas-itk-pixel-mqdt.docs.cern.ch
Module Assembly
When a new module is assembled on your site, you need to register this new-born module to Production DB. We recommend not to register a new module using ITkPD web page, since in order to determine the module serial number, there are several rules that should be uniquely determined by the subcomponents' serial numbers.
LocalDB provides a dedicated interface to register the module for you by determining the serial number.
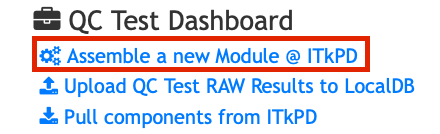
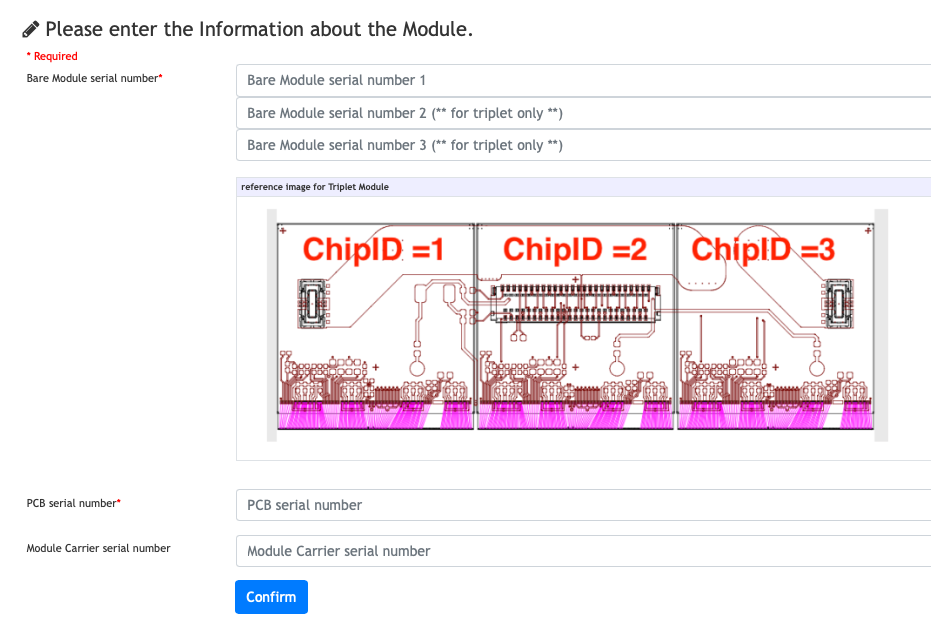
You will be requested to input only the following information:
- BareModule(s) serial number(s)
- PCB serial number
- Carrier serial number (optional)
Note
All subcomponents' location on production DB must be your site (the site you are registered in production DB).
Note
In order to assemble the module, BareModule needs to have all FE chips already.
Note
Not all sub-components need to be assembled previously.
Once the module is successfully assembled, the module's information is downloaded to your LocalDB, and you are ready to go.
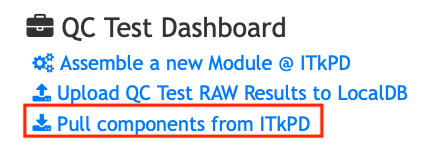
Downloading Module
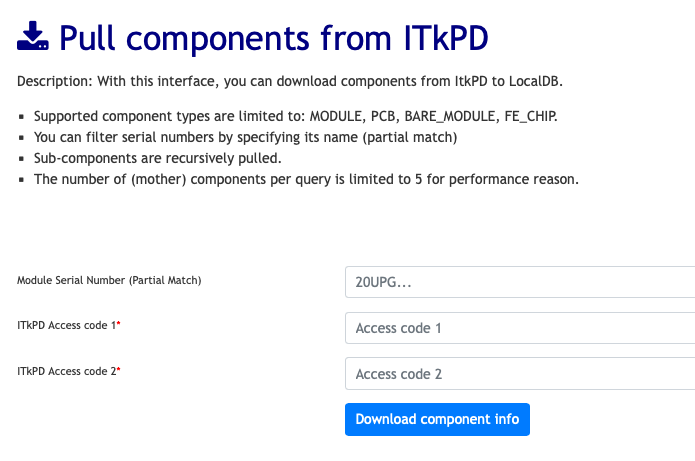
If the module assembly, or tests of the previous tests were carried out in the other site, you might not have the module in LocalDB though it is already registered in PDB. In this case, you should go to the top page of the LocalDB and click "Pull components from ITkPD" and follow the guide in the page in order to download the information of the module and sub-components, including the restults of previous stages.
Tip
This interface can be used to pull any supported components like Module, Sensor Tile, Bare Module, PCB etc.
Warning
If your downloaded module's stage is not a valid one (e.g. MODULETOPCB which was deprecated), you need to switch the module's stage to the correct one by hand. You can do this by clicking the "Switch Stage" yellow button of the module's page.
Warning
Please do not switch the stage except the above reason, unless you understand the behavior e.g. for debugging purpose. You may end-up wiping previous stages test records at the worst case.
Simple Electrical Tests
The following tests are the simple electrical tests:
- ADC Calibration (ADC_CALIBRATION)
- Analog Readback (ANALOG_READBACK)
- SLDO (SLDO)
- VCAL Calibration (VCAL_CALIBRATION)
- Low Power Mode (LP_MODE)
- Overvoltage Protection (OVERVOLTAGE_PROTECTION)
- Undershunt Protection (UNDERSHUNT_PROTECTION)
- Data Transmission (DATA_TRANSMISSION)
- Injection Capacitance (INJECTION_CAPACITANCE)
The term simple means that the QC analysis possible to generate only from each measurement result (RAW record) as the input.
LocalDB calls the corresponding module-qc-analysis-tools analysis command to evaluate the measurement, and records the analysis result as a format compatible with ITkPD's TestRun. RAW measurement, as well as all plots and log files of the analysis become as an attachment of this analysis result document.
Running a simple electrical test is essentially just running 3 steps:
-
Step-1: measurement itself
measurement-"$measName" -c "$config" -m "$connectivity" -o "$output" -
Step-2: analyze the measurement (process within LocalDB)
module-qc-tools-upload --path "${lastMeasDir}" \
--host "$localdbHost" --port "$localdbPort" \
--out "${anaResults}"
Here, as you can see in the command option, interaction with LocalDB happens. The client (DAQ host) submits the measurement result, and the QC analysis program evaluates it inside LocalDB. As a response, LocalDB returns the result output
JSON(TestRun format) -
Step-3: update the chip config of the DAQ host
Using the result of the analysis, the config file is revised locally within the DAQ host.analysis-update-chip-config -i "$anaDir" -c "$moduleDir" -t "$qctype"
Note
The chip config inside LocalDB is also revised reflecting the analysis output when module-qc-tools-upload is executed.
YARR Chip Scans
Note
Before going through this section, user is expected to have a basic idea of how the chip config is administrated in LocalDB. If you are not familiar with, please go through the doc.
YARR chip scans are simply possible to carry out by the scanConsole command. However, initially you need to generate the scan connectivity and chip config files using module-qc-database-tools.
Check LocalDB
Before starting anything about YARR scan, you need to make sure the presence of the module in LocalDB, and the QC stage is exactly the one you are going to test.
Note
Immediately after signing off from the previous stage, the LocalDB might not be ready to host any new test. If this is the case, when you navigate to LocalDB's module page, you will see a warning message like below.
[ WARNING_FE_CONFIG_NOT_READY ] 20UPGR91301046: WARNING: FE Chip configs for the current stage (MODULE/INITIAL_COLD) is not ready
Initial Generation of configs
The config needs to be deployed to the local DAQ host every beginning of the stage.
generateYARRConfig --sn 20UPGR91301046 \
--accessCode1 YOUR_ACCCESS_CODE_1 \
--accessCode2 YOUR_ACCESS_CODE_2 \
--outdir <the_dir_to_store_config>
Running scans
YARR scans are run via scanConsole:
cd path/to/yarr
./bin/scanConsole -r configs/controller/specCfg-rd53b-16x1.json \
-c 20UPGR91301046/20UPGR91301046_L2_warm.json \
-s configs/scans/rd53b/std_digitalscan.json \
-W MHT
An important option to be added to store the output result to LocalDB properly is the -W option. This option can append tags associated to the scan, which is convenient in the later phase when we carry out complex test analyses, as we will see later.
Three default tags are appointed by default:
MHTfor Minimal Health TestTUNfor TuningPFAfor Pixel Failure Analysis
On top of that, user can specify arbitrary user's tag as needed. The syntax of specifying multiple tags is as follows:
-W "['my temporary test', 'DEBUG', 'MHT']"
Attention
Do not use single or double quotations as a part of the tag name.
With -W option, not only the scan outputs like occupancy map, the chip config is also uploaded to LocalDB
Browsing scan results
The easiest way to check the latest YARR scan is to click the "YARR Scan" in the top navigation bar.

Then you can see the latest YARR scans in the reverse chronological order:
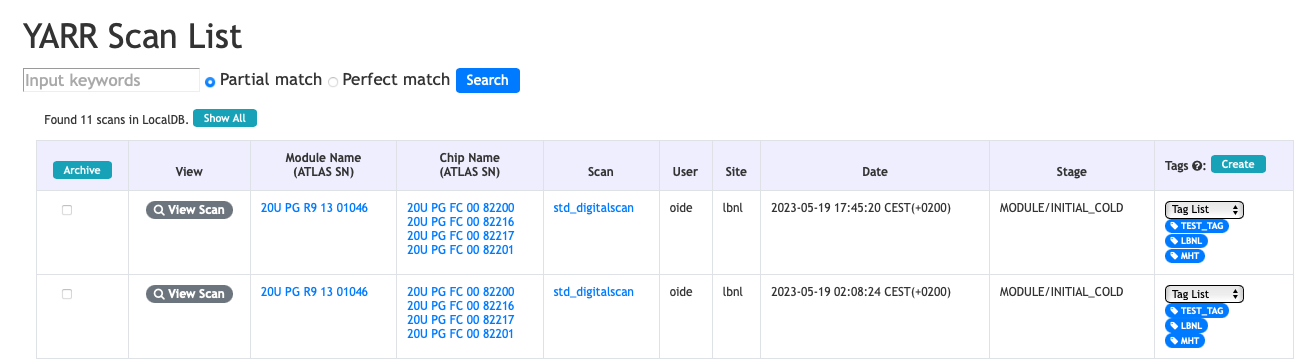
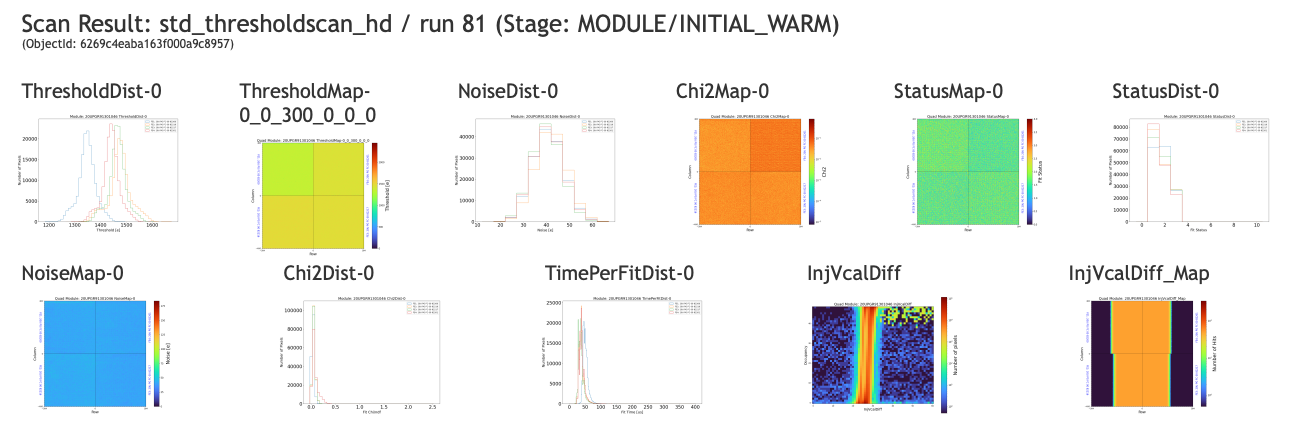
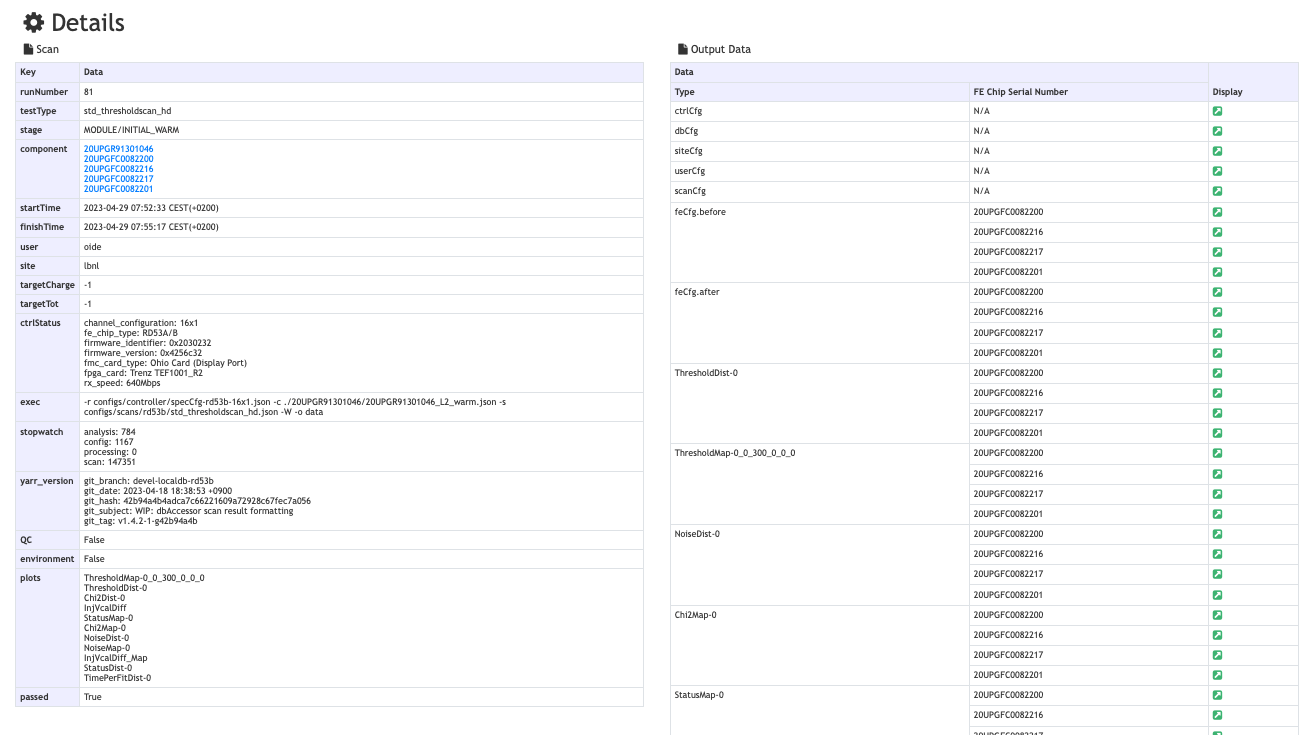
By clicking "View" button, you can see the detail of the scan, including plots:
Required scans
Note
The most accurate and up-to-date specification of electrical tests is documented in this repository.
- Minimal Health Test
std_digitalscanstd_analogscan.jsonstd_thresholdscan_hrstd_totscanwith-t 6000option
- Tuning (for quad with 1500e target threshold, for triplet with 1000e target threshold)
std_thresholdscan_hrstd_totscanwith-t 6000optionstd_tune_globalthresholdwith-t 1700option (200e overtune)- (ITkPix v2 only)
std_tune_globalpreampwith-t 6000 7 - (ITkPix v2 only)
std_tune_globalthresholdwith-t 1700option (200e overtune) std_tune_pixelthresholdwith-t 1500optionstd_thresholdscan_hdstd_totscan
- Pixel Failure Analysis
std_digitalscanwith-m 1optionstd_analogscanstd_thresholdscan_hdstd_noisescan
Registration of Complex Electrical Tests
A complex electrical test can be registered to LocalDB using the browser, once you completed the entire list of scans required for the test.
From the Front-end chip's page, or the Module list table, you can access to the chip's page.
When you scroll down, you find an orange table listing Tests of the stage.
If you sign-in to LocalDB, you will find a green button "Checkout Scans" at the column "Action" for Minimal Health Test, Tuning or Pixel Failure Analysis.
Pushing this button, you will be guided to register the set of YARR scans to evaluate the Test.
The tag you specified during the YARR scan, like MHT, TUN, or timestamp or run number will hint you which scan you will need to register here.
Note
But these are only guides up to the end, the user needs to take the responsibility of the validity of the scan results.
Tip
Do not worry if you miss to register wrong scans, you can create more than one complex analysis result until you meet the correct registration.
Note
You can skip to register some scans if you do not have or you could not take those scans. The analysis can run without these scans entry. Of course, the result of the analysis is most likely failure.
Note
Although you register scans chip-by-chip, you can specify the same set of scan runs for all chips as common. In order to do this, you just need to check the checkbox at the bottom of the page. This checkbox is actually toggled on by default. However, if you have reasons to select runs for individual chips, you can do.
At the end of registration, the analysis script runs on the server side, and the QC pass/fail is judged for the test.
Electrical Test Summary
For each stage requiring electrical test, a summary record test called "E-Summary" is allocated. This is the place to aggregate all FE-level test results and make summary e.g. total bad pixels of the module. The user interface is similar to the above Complex Electrical Tests case, but you are guided to register the record of Minimal Health Test or Tuning instead of registering YARR scans.
Note
Do not confuse Module-level tests with FE-level tests. Electrical Summary Test is a Module-level test, while Minimal Health Test, Tuning, etc. are FE-level tests.
Stage Sign-off
Once all tests of the stage are filled, you can proceed signing-off the stage.
Info
Stages can even be signed-off with some missing tests, as this is a commissioning phase and not all tests are ready to serve.
Click the blue "Stage Sign-off" button under the module's page. In the next page, you are required to select one result per tests (there can be multiple candidate results if you have done multiple times).
Note
Do not confuse Module-level tests with FE-level tests. Module-level tests include E-Summary and various non-electrical tests.
Once you selected all results, you can proceed to do sign-off.
Info
Sign-off has technically two steps. The first step is Local Sign-off where the stage is only incremented locally within the LocalDB. The second step is Push to Production DB and the results are synchronized to Production DB after this second step.
Non-electrical Tests
Non-electrical tests are not commissioned yet in LocalDB v2.2. A few preview tools are prepared, but these should not be regarded as full commissioned.